I have been obsessed with Detroit: Become Human since before it was released, as a fan of all things robots I followed the project with interest. And of course Connor immediately became my favourite character (Ruthless!Connor all the way). I have been battling Chronic Fatigue Syndrome on and off for years now and Detroit was released when my health and personal life were at their worst and things only seemed to be on the decline. So this game was one of the few things I could spend my time doing and it was a beautiful world to escape into. But just because I was sick didn’t mean the desire to cosplay died. At the time I didn’t think there was much hope of me ever being able to sit up and sew ever again. But my health has been improving this year and slowly this costume has come together. There will be a separate post for the photo shoot, this post documents my process of construction.
As I mentioned, I was so sick back in July 2018 that I didn’t think I could make a costume myself, so I bought one from CosplaySky for $50, it’s not bad for the price. But I figured if I did get better, I could still use the tie, armband and triangles on my own costume. So not a waste at all.
Then I tried altering it which made it slightly more acceptable, it wasn’t up to my standards, but it would do. I’d rather have a mediocre costume to wear to the conventions than not have one at all.
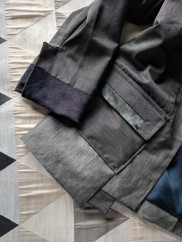
Unsatisfied with the costume, a few weeks later I went out and bought some fabric. I had no idea when I would be able to begin this project if at all, but it felt good to have made the perfect fabric choices. I really paid close attention to the drape and texture of Connor’s jacket. I also took into consideration the Australian climate and landed on these light, breathable silk wools. They had just the right look. For the darker, textured areas, corduroy was the perfect solution.
All costumes should begin with a trade sketch, I find this is the most effective way to get a sense of all the details of a costume and how they tie together and what their proportions are. And this is certainly a highly detailed costume, about 40 individual pieces that all had to be perfectly proportionate.

I drew the illustration in September but it wouldn’t be until December that I had the energy to make the first toile. I prefer to begin all of my projects with a commercial pattern, it saves a lot of time.
January I made my second toile and it became apparent there was a lot of work to do!
At this point my health was improving and I made a third toile soon after, it’s really hard to do fittings on yourself, you can’t see the garment that well when it’s on you, even in front of a mirror. Plus pinning something you’re wearing can be gymnastic exercise sometimes. Comparing these toiles together I see things changing that I didn’t even intend to change and I cannot explain how it happened.
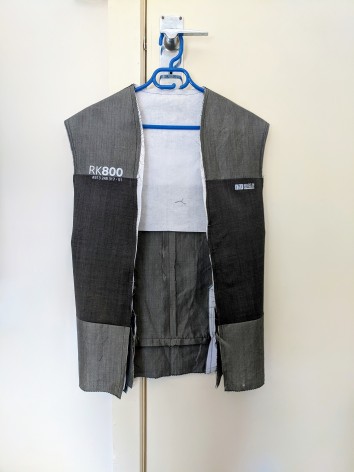
Here’s the fourth and final toile.
Sure enough, having spent so long in the research and prototype phase, the construction of the final jacket took less than a month even though I still battle with fatigue and have to divide my time amongst other responsibilities.
Details, details, details
- I tried to replicate the angle of the grainline on the corduroy as much as I could.
- I designed the digital pattern and printed it through Spoonflower. Silk was the closest option I had in terms of shiny appearance. It will likely age better than vinyl which I try to avoid at all costs. If you would like some for yourself, it is available here.
- And the decals came from Ever So Pretty Designs on Etsy, great stuff, it’s the perfect size and even has a slight reflective sheen.
- I decided to go with piping for the blue and grey strip features on the back, it gives a professional finish and the most sensible compromise considering these features are futuristic on Connor’s jacket.
- I simplified the vents on the sleeves as they didn’t seem functional, so they’re simply flaps that I hand-stitched down.
- The importance of interfacing cannot be overstated. I see so many costumes at conventions that are too rigid or too soft. Considering this is essentially a suit jacket, getting interfacing that was the right quality and weight was essential.
- I really love the digital print back vent panels, I had fun sewing those in. The silk was very light so I used iron on interfacing to stabilise it.
- The collar was a joy to work on, detailed but nothing too difficult and all those colours together look great.
- Even after four toiles, somehow the sleeves were still too big, I have no idea how that happened. But this is why we buy a little more fabric than we need.
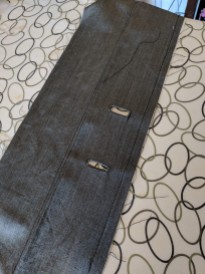
- Connor’s jacket has “vestigial” button holes. Much like the modern suit has remnants of once functional features, like the lapel button, these future jackets seem to only have button holes for decoration. They are double welt button holes, which are very fiddly, but thankfully I didn’t have to make them functional.
Making costumes based on video games is the easiest of all media types. With film and TV you have to deal with dimly lit scenes, motion blur and camera angles that obscure most of the costume. A costume that might be onscreen for all of a minute. Cartoons and comics are generally designed and illustrated by artists who don’t understand clothing the same way I do as a tailor, or they’re just so stylised it’s difficult to figure out what they’re suggesting. Sometimes a costume changes from scene to scene, panel to panel. Game developers aren’t exactly costume designers either, but the costumes have to obey certain laws of physics. And games also allow you to control the camera, some games, like Detroit, even allow you to get a detailed look at the character as bonus or unlockable content. It’s a costume maker’s dream come true, a super high-res rotatable model under bright lights. As I’ve mentioned, Connor’s jacket is surprisingly detailed, but it is also very complex, it behaves in ways a jacket just can’t in real life. It sits perfectly smooth and flat against his body at all times, even in action sequences. It doesn’t even buckle or swing out when he raises his arms. Here’s an example. 
That’s not how fabric works! So in order for my jacket to sit in such a flawless way I have decided to use magnets attached to a harness that will go under my shirt. I notice other Connor cosplayers have a problem with this, the jacket wants to do what jackets want to do, which is swing out from the body. I think magnets will be an elegant solution. But that is yet to be done, I also plan on making the triangle badges in resin. So keep an eye on this post for more.


Pingback: Detroit: Become Human Connor Cosplay – Travian Designs
Hello! I was wondering if you ever put the pattern for this costume up for sale? I’m trying to make my own jacket and I don’t the experience to build a pattern like you did so I’m very interested in buying the pattern from you. You did so masterfully on this costume it’s inspirational.
I was also wondering, you designed the black digital pattern on spoonflower, did you ever release a blue version for parts like the triangle?
Thank you for anything you can tell me! 🙂 Magnificent work
LikeLike
I’m so glad to hear it! I am actually working on making a pattern to sell, and I have been in the process of making the badges. I was not satisfied with the resin ones, so I intend to work with textiles as I believe that may achieve a more faithful and professional look. I will keep you posted on the sewing pattern, it’s the busy time of year and I am without internet in my new apartment, but hopefully I can get to work on finalising it in January.
LikeLike
Brilliant. I’m glad to hear it. Take your time, it’s going to be awesome. Good luck! Thanks for the quick response. 🙂
LikeLike
Hello, I am also interested in buying the pattern. How’s it coming along? 🙂
LikeLike
Hi, shouldn’t be too long now. I was delayed because of covid lockdown, I needed a tape mannequin to properly tailor the jacket. Now I’ve got one, I think I just need to make one more toile and then I can create the final pattern. You can follow me on instagram for updates: https://www.instagram.com/p/B9duzNejCUR/
LikeLike